How to use Level EDITOR
Use Level Maker Editor for creating your unique level design.
ATTENTION!Please, use scenes --->Assets / Scenes / game when you create and edit your levels!


1- Editor section - here you can create your levels.
2- Levels - enter a number of levels for creating or editing.
To switch between the levels, use the buttons "Previous level" or "Next level" or enter a number of levels by hand.
ATTENTION! You don't need to worry about saving data.All actions are automatically saved!
3- Test level - Use this button after creating a level if you want to test.
4- New level - to create a new level press the "New level" button. The level is automatically created. You just need to create a level design.
5- Rows - number of the rows on game field. Maximum 11.
6- Columns - number of the columns on game field. Maximum 9.
7- Limit - you need choose the gameplay for your level. The Engine included two type of game play - Moves or Time. The drop-down menu select the type of gameplay:

*If you choose MOVES, you need to enter a limit on the number of moves for this level
*If you choose TIME, you need to enter a limit on the number of minutes and seconds for this level
8- Color limit - number of color on current level (minimum 3 - maximum 6)
9- Stars - number of scores for each stars (Star1 - minimum scores for win)

10- Target - you need to choose the target for your level. This editor included 4 versions of targets:
SCORE - get necessary number of scores and get one star
COLLECT - get necessary number of items
INGREDIENTS - get the necessary number of ingredients.
BLOCKS - when you choose this target, additional blocks are available. This block is the target. Players need to destroy all the same blocks to win.

NOTE:
If you select the limit for color of items, you can't choose some items. For example, if you select to limit 5 items, you can't choose "item 6" in settings.

ATTENTION!
Double-clicking creates a double layer of this block when you create or edit your level.

Empty - use for clearing space.
None - use for cut a slot.
11- Tools - Press button "Clear" to reset your settings.
12- Blocks - it is obstacles. Click on the icon on any block and click on the game field.
13- Game field - place for actions in game. You need to click on the wisher block then click on the game field, and the block appears in a specified place.
Settings tab
ATTENTION!
Please, use scenes --->Assets / Scenes / game.unity when setting up the game!

1- Settings - you can setting up your project here;
2- Reset to default - reset all your setting;
3- Score settings - all settings about score;
4- Score for ITEMS - you can change a score for destroying game ITEMS (all jelly, stripes jelly and packages);
5- Score for BLOCK - you can change a score for destroying game obstacles - BLOCK / DOUBLE BLOCK
6- Score for WIRE BLOCK- you can change a score for destroying game obstacles - WIRE BLOCK
7- Score for SOLID BLOCK- you can change a score for destroying game obstacles - SOLID BLOCK
8- Score for THRIVING BLOCK - you can change a score for destroying game obstacles - THRIVING BLOCK
9- Show POPUP score - if you want to show popup score, you need check it

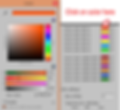
10- Score color item- you can change the color for each score of the items. You need just to click on color field and select a new color in the window "Color" like on Screenshot:
11- Score color outline item- the same like "Score color item"
12- Life settings - all settings of life.
13- Max of life - maximum number of life. Five lives by default. But you can change it like you wish, just change this number:

14- Total timer to refill life - timer for refill one life. 15 minutes by default. But you can change it like you wish, just change this number:

15- Cost of refilling life - cost for refill is 12 gems by default, but you can change it. Just change this numbers:

16- Failed settings - when a player fails a level, he can give up or buy more moves or time and continue the game. You can change the settings for this menu.

17- Cost of continue - you can change this number of gems for the cost of continue the game:

18- Extra moves - number of moves for continue. Just change this number:

19- Extra seconds - number of seconds for continue. Just change this number:

20- 21- 22- 23- 24- Target's descriptions - when the game starts, appear the banner with target's text. You can change it in this window.

Shop settings
In Shop Setting you can set the price for gems and boosters.

1- Shop - here you can change the price for gems (in dollars) and boosters (in gems).
2- Reset to default - reset button
3- Gems shop settings - count and price for gems (in dollars) for each stack.

4- Gems count - here you can change the number of gems and price for this.
5- Booster shop settings - settings for buying each boosters in game.

6- Description - change it if you need for each boost

7- Count of boosters for each stack

8- Price (how much gems need for purchase each stack of boost)

GUI editor
Use it for comfortable searching and changing the GUI dialogs. Here you can move any objects. Also for editing fonts and texts.

-
Open GUI Editor
-
Click "show" opposite of necessary game menu.
-
Look on Hierarchy, you will see that this game object was selected.
-
Expand this game object
-
Choose what you want to change.
Rate Us
It will show on map after passing level.
If a player click “Rate” once it will never shows again.
-
Show Rate every – how often you want to show Rate dialog.
-
URL – path
